Razorpay is the payment gateway used by Estackly for online payments. Once your Razorpay account is connected, customers can pay by UPI, credit/debit card, net banking, or wallets — directly at the POS checkout screen, the self-order kiosk, and the customer-facing display. This guide covers everything from creating a Razorpay account to enabling each payment surface.
Step 1 — Create a Razorpay Account
- Go to razorpay.com and click Sign Up.
- Enter your business email and mobile number, then verify both.
- Fill in your business details — legal business name, business type (proprietorship, LLP, private limited, etc.), PAN number, and bank account for settlements.
- Upload the required KYC documents (PAN card, proof of business address, cancelled cheque or bank statement).
- Razorpay reviews your account, typically within 1–2 business days. You will receive an email once activated.
Step 2 — Find Your API Keys
- Log in to your Razorpay Dashboard at dashboard.razorpay.com.
- In the left sidebar, go to Settings → API Keys.
- Click Generate Test Key (or Generate Live Key once your account is activated).
- Razorpay shows you two values:
- Key ID — starts with
rzp_test_(test) orrzp_live_(live). This is safe to copy anywhere. - Key Secret — shown only once at the time of generation. Copy it immediately and store it securely. If you lose it, regenerate a new one.
- Key ID — starts with
Step 3 — Enter Your Keys in Estackly
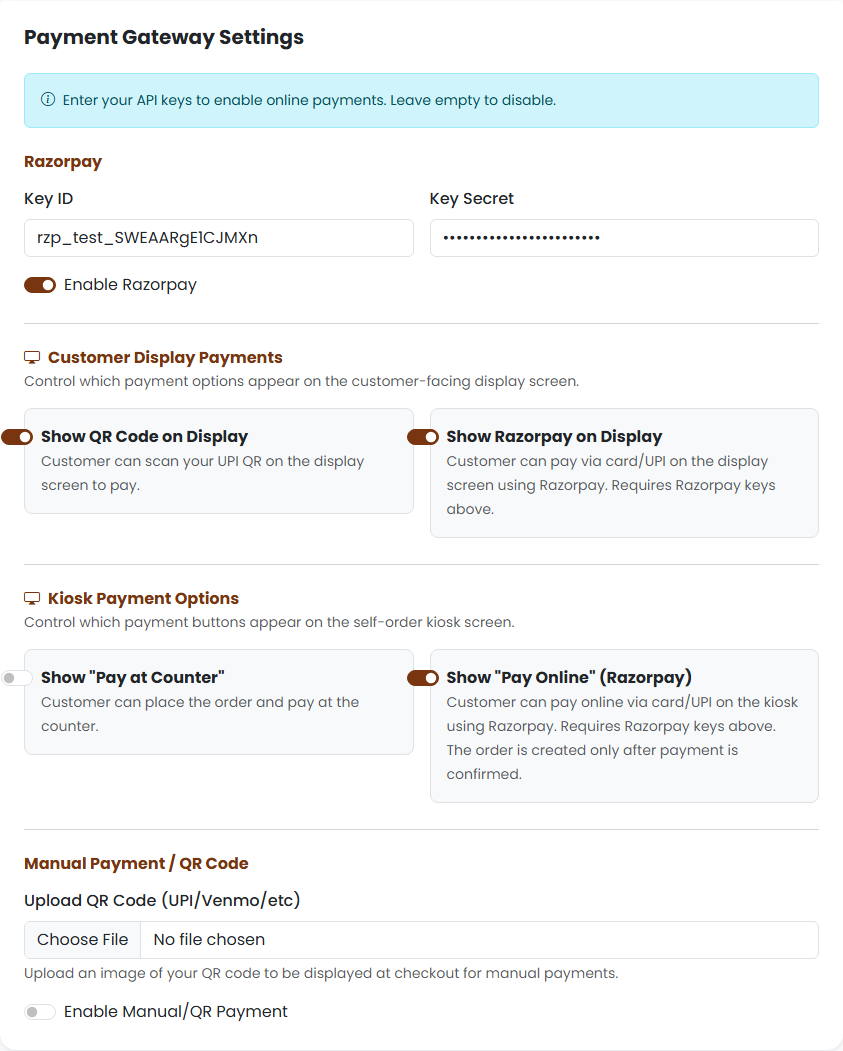
- In your Estackly admin panel, go to Settings → Payments.
- Under the Razorpay section, enter:
- Key ID — paste the
rzp_test_...orrzp_live_...value. - Key Secret — paste the secret key.
- Key ID — paste the
- Toggle Enable Razorpay to ON.
- Scroll down and click Save Settings.
That's the core setup. Razorpay is now active for POS checkout. The sections below let you enable it on additional payment surfaces.
Step 4 — Enable Payment Surfaces (Optional)
Customer Display Screen
The customer-facing display screen (/restaurant/displays/queue or the billing display) can show a Razorpay payment button so customers pay directly from the screen at the counter.
- In Settings → Payments, find the Customer Display Payments section.
- Toggle Show Razorpay on Display to ON.
- Optionally also toggle Show QR Code on Display if you want your UPI QR alongside it.
- Save settings.
Self-Order Kiosk
If you use the self-order kiosk, customers can pay online immediately after placing their order — the kiosk only confirms the order once payment is captured.
- In Settings → Payments, find the Kiosk Payment Options section.
- Toggle Show "Pay Online" (Razorpay) to ON.
- You can keep Show "Pay at Counter" enabled alongside it to give customers a choice.
- Save settings.
Step 5 — Upload a UPI QR Code (Manual Payments)
If you prefer customers to scan a static UPI QR code and you confirm payment manually, Estackly also supports this alongside (or instead of) Razorpay.
- In Settings → Payments, scroll to Manual Payment / QR Code.
- Upload your QR code image (download it from your UPI app — PhonePe, Google Pay, Paytm, or your bank).
- Toggle Enable Manual/QR Payment to ON.
- Save settings. The QR image will now appear at POS checkout when the cashier selects Manual/QR as the payment method.
How Payment Works at Checkout
When a cashier clicks Checkout → Pay Online at the POS:
- Estackly creates a Razorpay order for the exact bill amount.
- The Razorpay payment popup appears — the customer can pay via UPI, card, net banking, or wallet.
- On success, Razorpay returns a payment ID and signature. Estackly verifies the signature server-side using your Key Secret.
- Only after verification does Estackly mark the order as Paid, award loyalty points, and free the table. No manual confirmation is needed.
Switching from Test to Live Keys
- Activate your Razorpay account fully (complete their KYC and business verification).
- In Razorpay Dashboard → Settings → API Keys, generate Live Keys.
- In Estackly → Settings → Payments, replace the test keys (
rzp_test_...) with your live keys (rzp_live_...). - Save. Live payments are now active — customers will be charged real money.
Settlement to Your Bank Account
Razorpay settles payments to your registered bank account on a rolling basis (typically T+2 business days for standard accounts). You can view settlement reports and download GST-compliant payment receipts directly from the Razorpay Dashboard under Payouts → Settlements.
Frequently Asked Questions
What happens if a payment fails or the customer closes the popup?
The order is not marked paid and no money is collected. The order stays in its previous state (pending or draft) and the cashier can retry the payment or collect cash instead.
Can I accept both online and cash payments?
Yes. At POS checkout you can choose the payment method per order — Cash, Card, UPI/QR, or Razorpay online. All methods can be active simultaneously.
Does Razorpay charge a fee per transaction?
Razorpay charges a platform fee (typically 2% + GST) on each transaction, deducted before settlement. This is separate from Estackly's subscription — check Razorpay's current pricing at razorpay.com/pricing.
My payment is showing "signature verification failed" — what do I do?
This almost always means the Key Secret entered in Estackly does not match the one active in Razorpay. Go to Razorpay Dashboard → Settings → API Keys, regenerate a new secret, and update it in Estackly → Settings → Payments.